
This is your click-by-click guide for creating a digital course using a Searchie Hub. 🤓
Be sure to complete Plan It before diving into Build It. You’ll be using the content you created during Plan It to build your digital course.
The goal of the Build It Workbook is to show you how to:
- Select a template for your course
- Customize how your course looks
- Upload your course content
You’ll come out of this training with a private digital course like this:

Let's get you launched today! 🚀
Lesson 1 - Take a site tour of your Searchie account
Start unlocking the power of Searchie by signing into your Searchie account!
Learn how to navigate your Searchie account using the site tour. In your site tour, you’ll get an introduction to where things live in your Searchie account. You’ll also see how you can get started with building your digital course.
If you’re new to Searchie, you might see some new terms and phrases. No worries! Check out our Searchie Glossary. 🔖
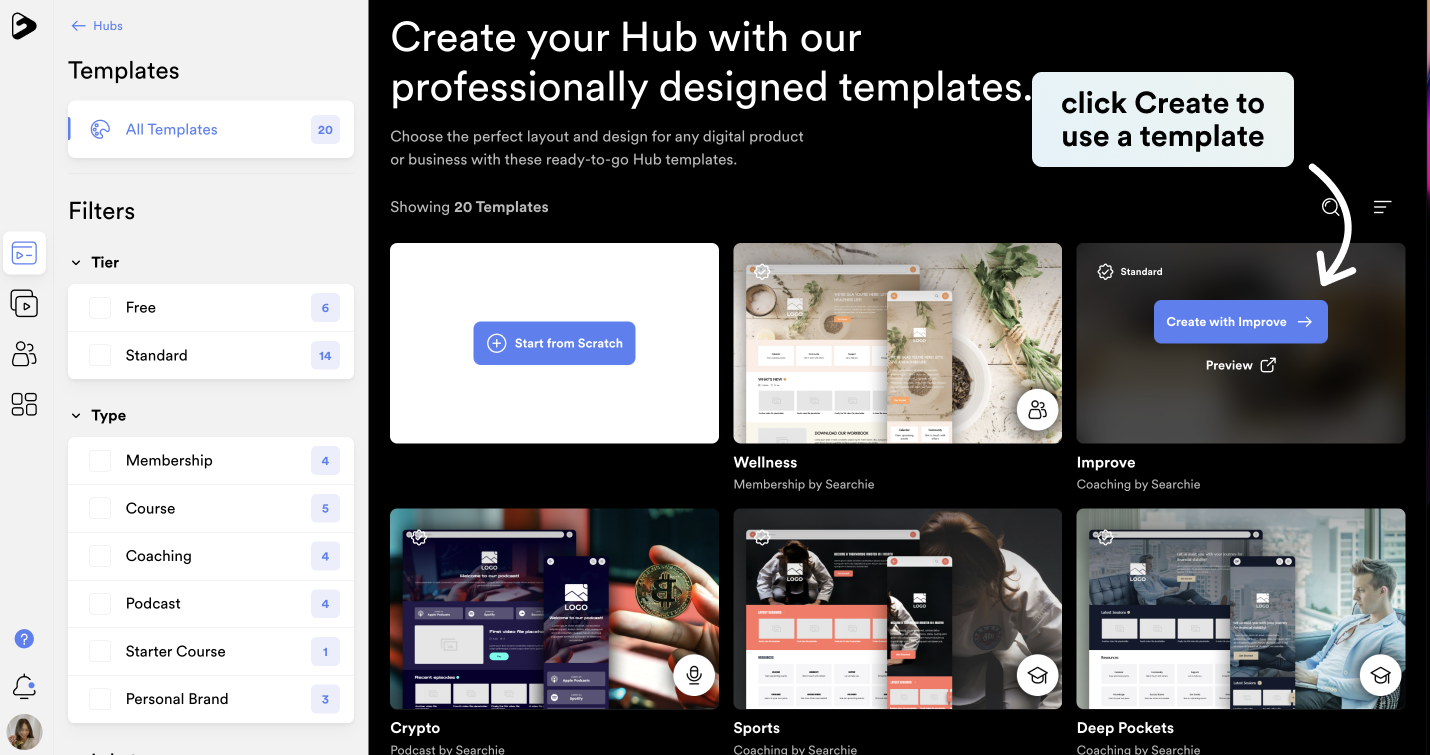
Lesson 2 - Load Your Course Hub Template
Select one Hub template for your digital course and load it instantly into your Searchie account.
Open Searchie’s Hub Template Library to select your course template. We recommend using the Wellness template as this template was created for starter courses. Once you select your Hub template, you'll be able to customize your site to reflect your branding and colours.
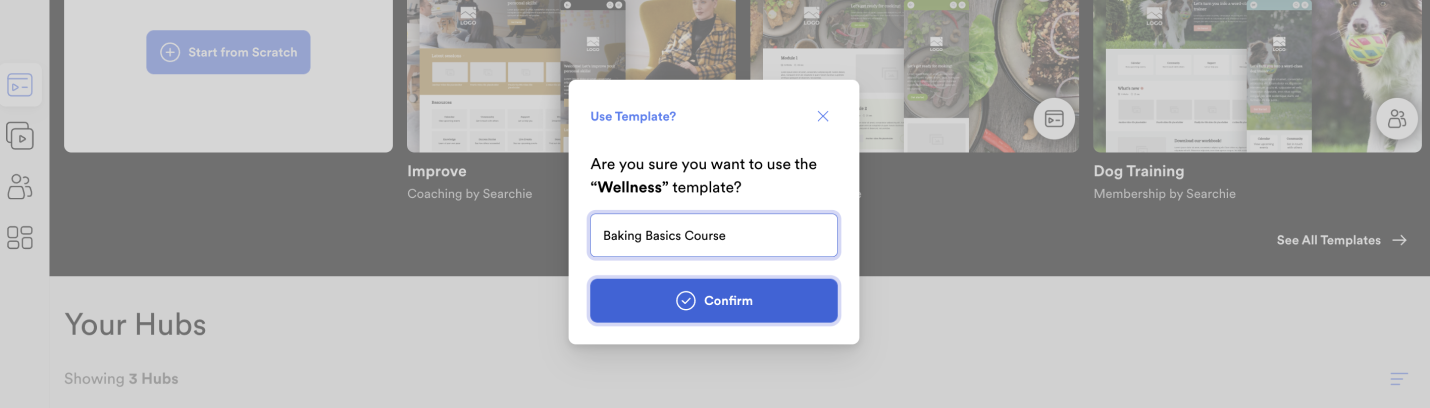
Name your digital course and click ✅Confirm to save your changes.
Lesson 3 - Open Your Hub Editor
Get started with customizing your new digital course to make it feel more like home! 🏡
After you create your Hub in Lesson 2, you’ll be taken inside your Hub Dashboard. From here, click 🛠Customize to access your Hub Editor. This is where you’ll be building your digital course!

Lesson 4 - Customize How Your Course Looks
Edit your digital courses’ images and text using the Hub Editor.
Lesson 4 Step 1 - Customize your Hub sections
Click ⚙️Settings next to a specific element to edit how your text, images and buttons appear.
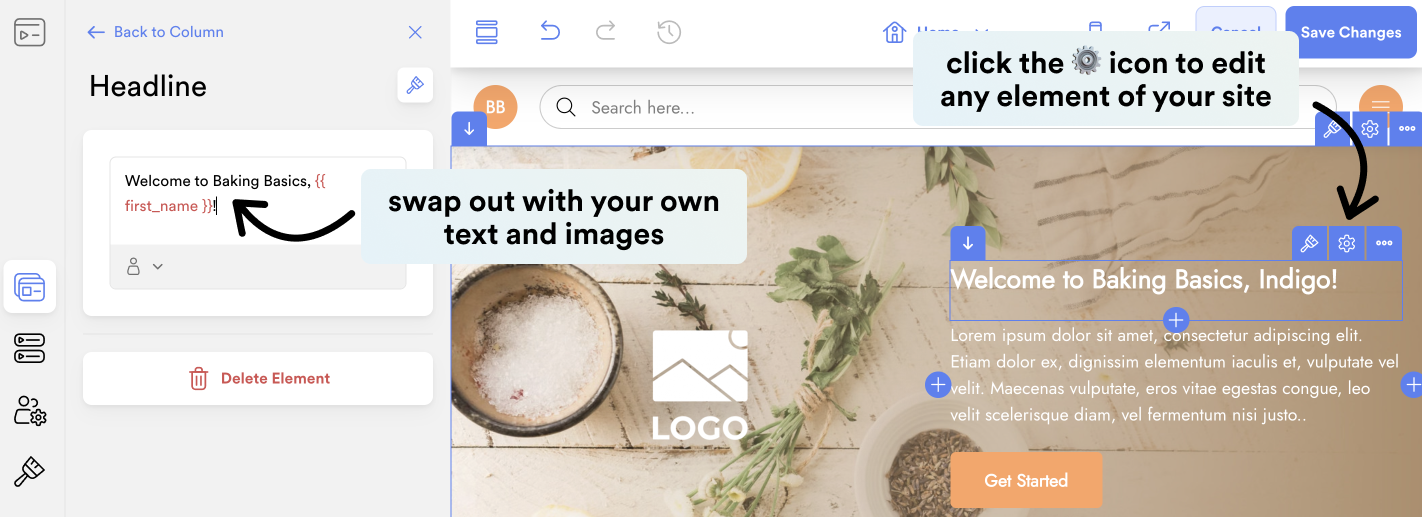
Click 🖌Appearance next to a specific element to edit the styling of that element.

Be sure to Save Changes once you’re happy.
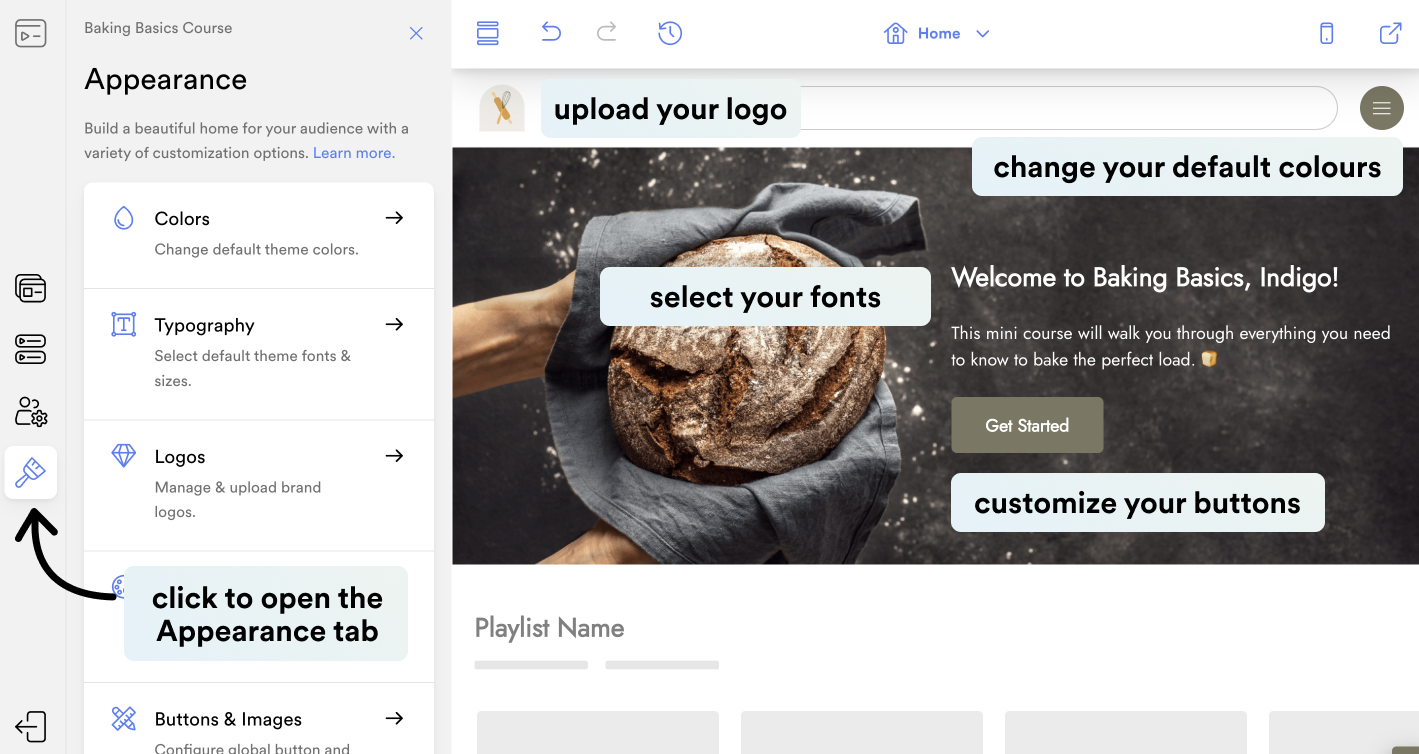
Lesson 4 Step 2 - Customize your Hub appearance
Add your brand colours and logo to your digital course.
Head to the Appearance tab of your digital course to tweak your site colours, font and logo.
Lesson 5 - Upload Your Course Videos
Upload your course content to your digital course.
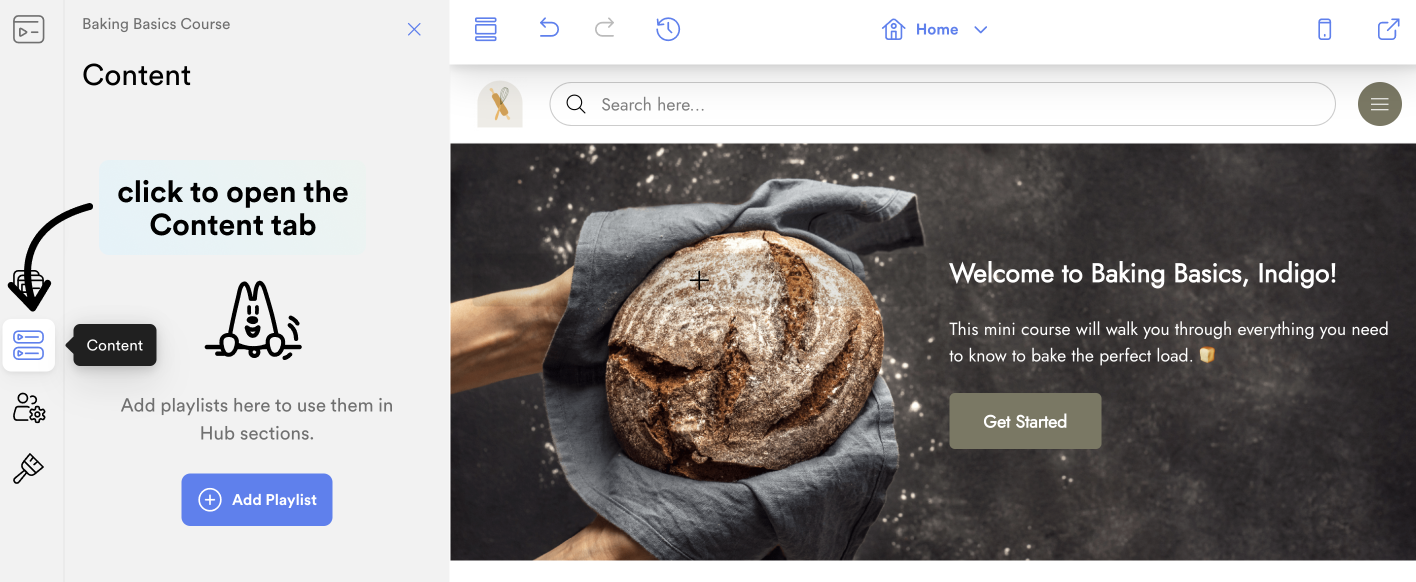
Lesson 5 Step 1 - Open the Content Tab
Head to the Content tab of your digital course to get started with uploading content to your digital course.
Lesson 5 Step 2 - Click + Add Playlist
Next, we’ll want to create a Playlist to hold your course content.
A Playlist is a list of media files that you curate and share with your audience. Use Playlists to sort your content based on things like deliverables, modules, topics and tracks
Click the blue + Add Playlist button to create a Playlist. From here, click Create Playlist.
Give your Playlist a title and save it by clicking ✔️.
Lesson 5 Step 3 - Upload Content to your Playlist
From here, it’s time to upload your videos into your digital course.
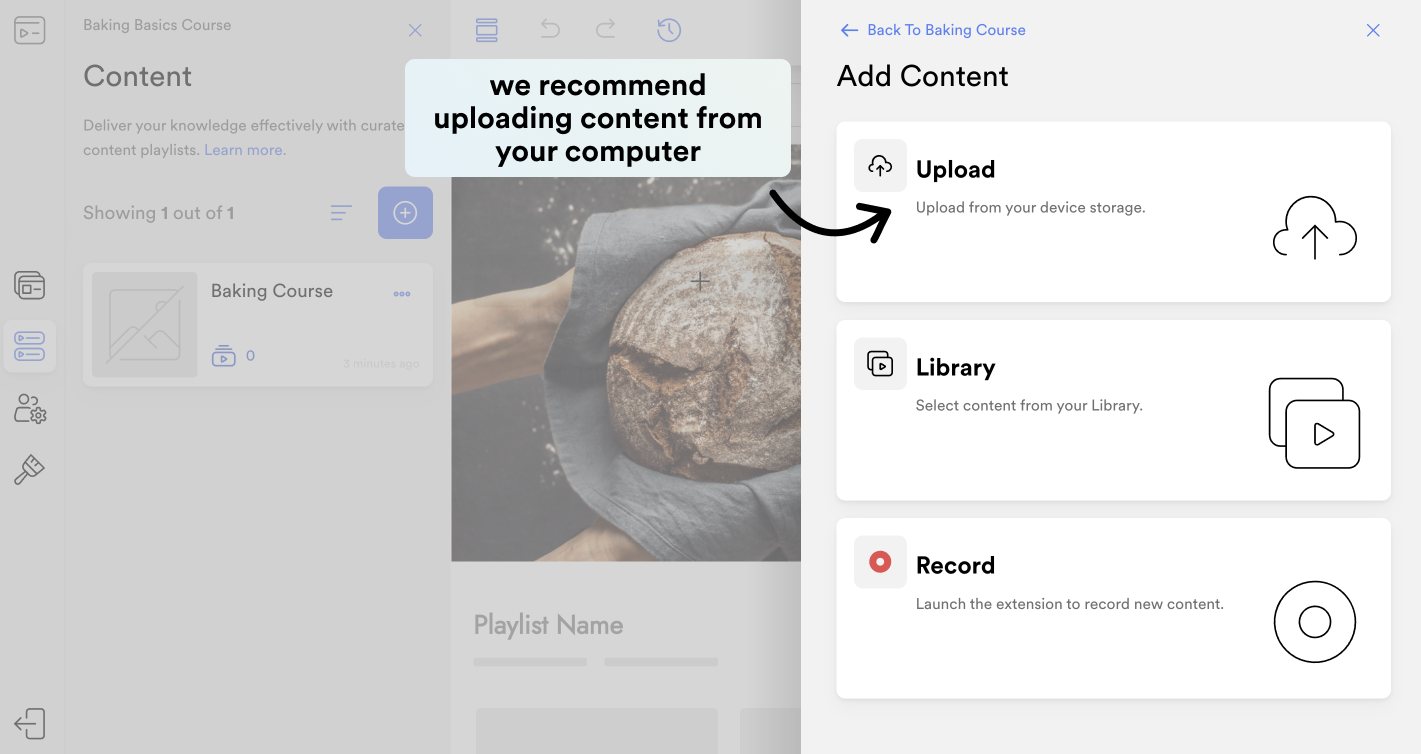
Click + Add Content to upload videos (or audio files) to your Playlist.

From here, you have a few different options:
- Upload videos from your computer
- Pull in existing videos from your Library
- Record your course videos using the Searchie Chrome Extension
Choose your preferred content upload option and follow the instructions to add your content to your Playlist.
From here, you’ll need to create or select a Folder to store your video in. Folders are used to help you organize the content inside your Searchie account. You can select an existing Folder for your Playlist’s videos, or you can create a new Folder.
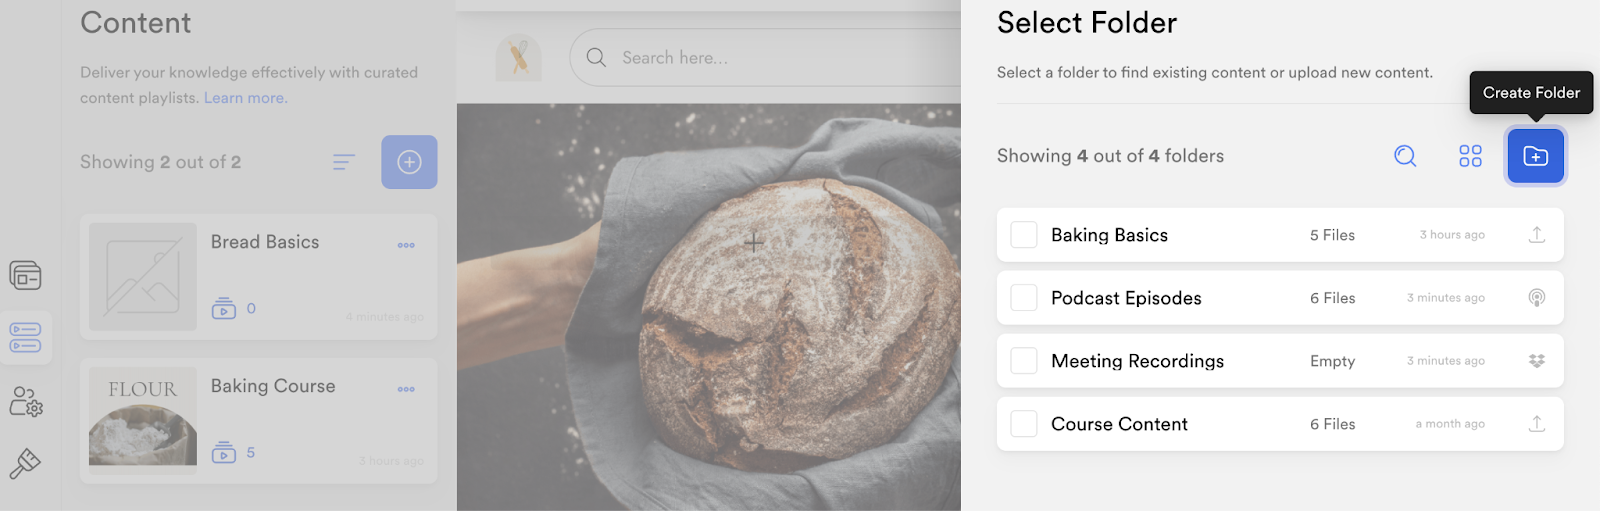
Once you have selected a Folder for your Playlist’s videos, click to select your videos from your computer and click ✅Upload to start uploading your files into your Searchie account.
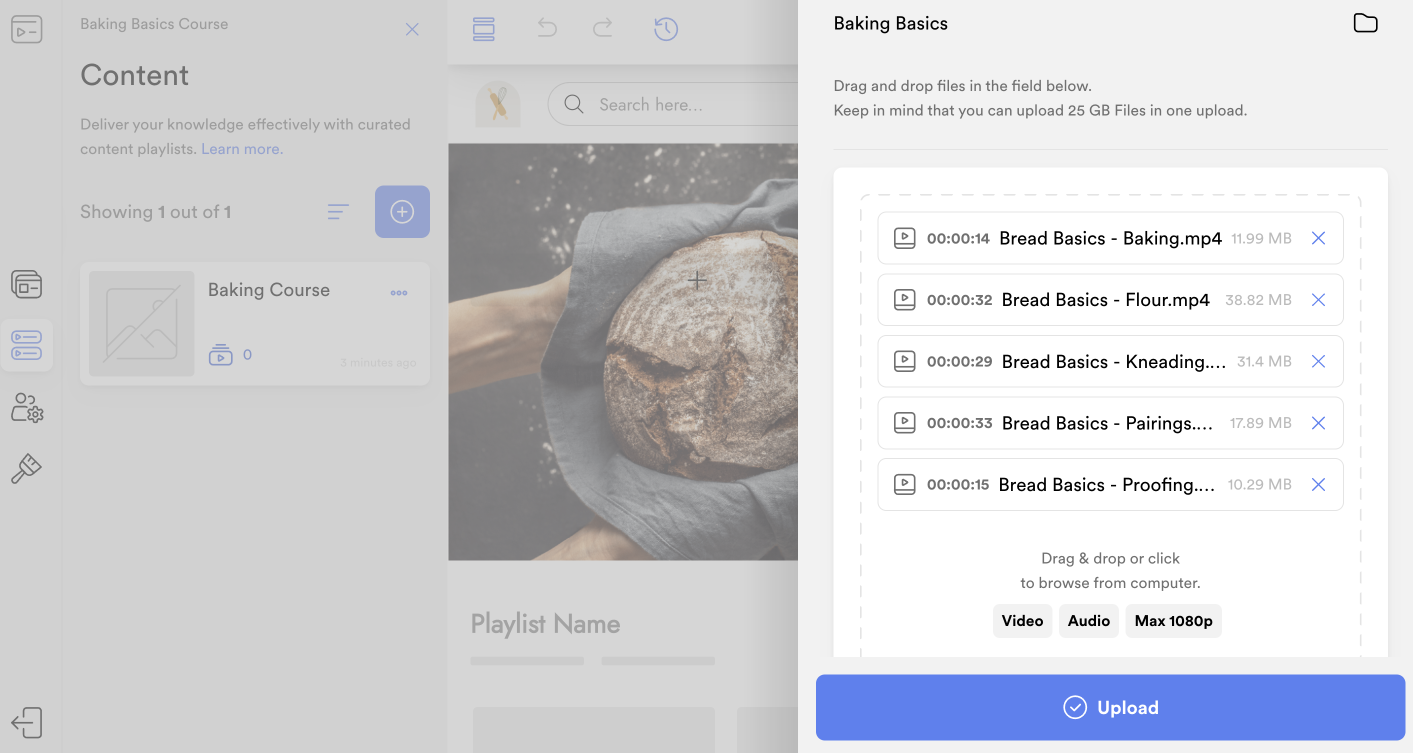
Once your files are done uploading, they’ll appear in your Playlist. As your files are uploaded, they will be automatically transcribed, captioned and made searchable. 😉
Lesson 6 - Customize your Playlist
Once you select videos for your Playlist, you have several different options to customize your Playlist.
After your files are done uploading, click on your Playlist from the Content tab to customize it. This is where you can:
- Edit the Playlist’s title and/or description.
- Click and drag your videos into place to re-order your Playlist.
- Click the blue ➕ button to add more videos to your Playlist.
- Click the three-dot menu to duplicate or delete your Playlist.
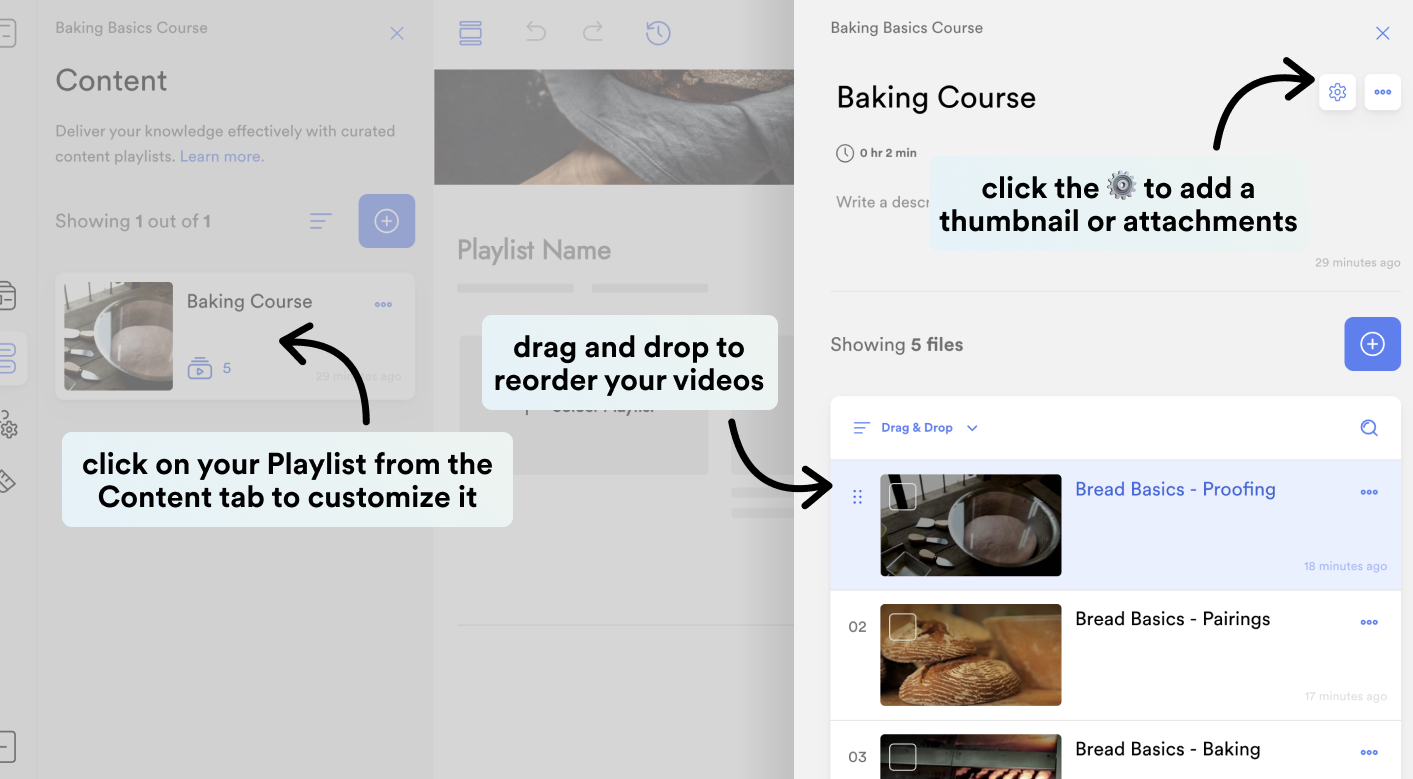
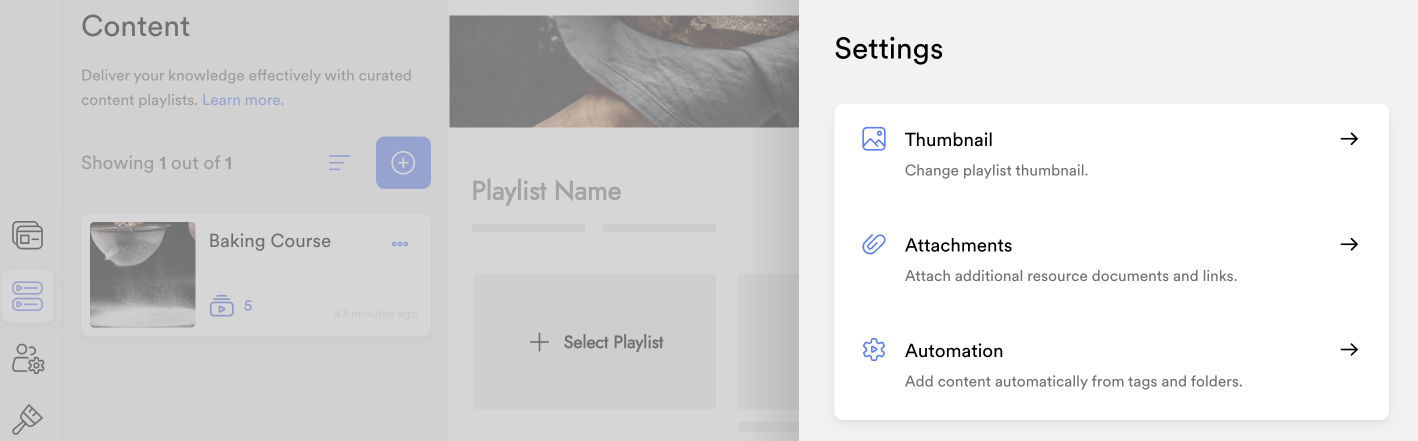
Click ⚙️Settings for several other Playlist customizations options such as
- Adding a Thumbnail
- Adding Attachments (like PDFs) to your Playlist
- Automate your Playlist with a Folder (more on that here)
You can also click on any video in your Playlist to customize that specific file’s title, description, Thumbnail and/or Attachments.

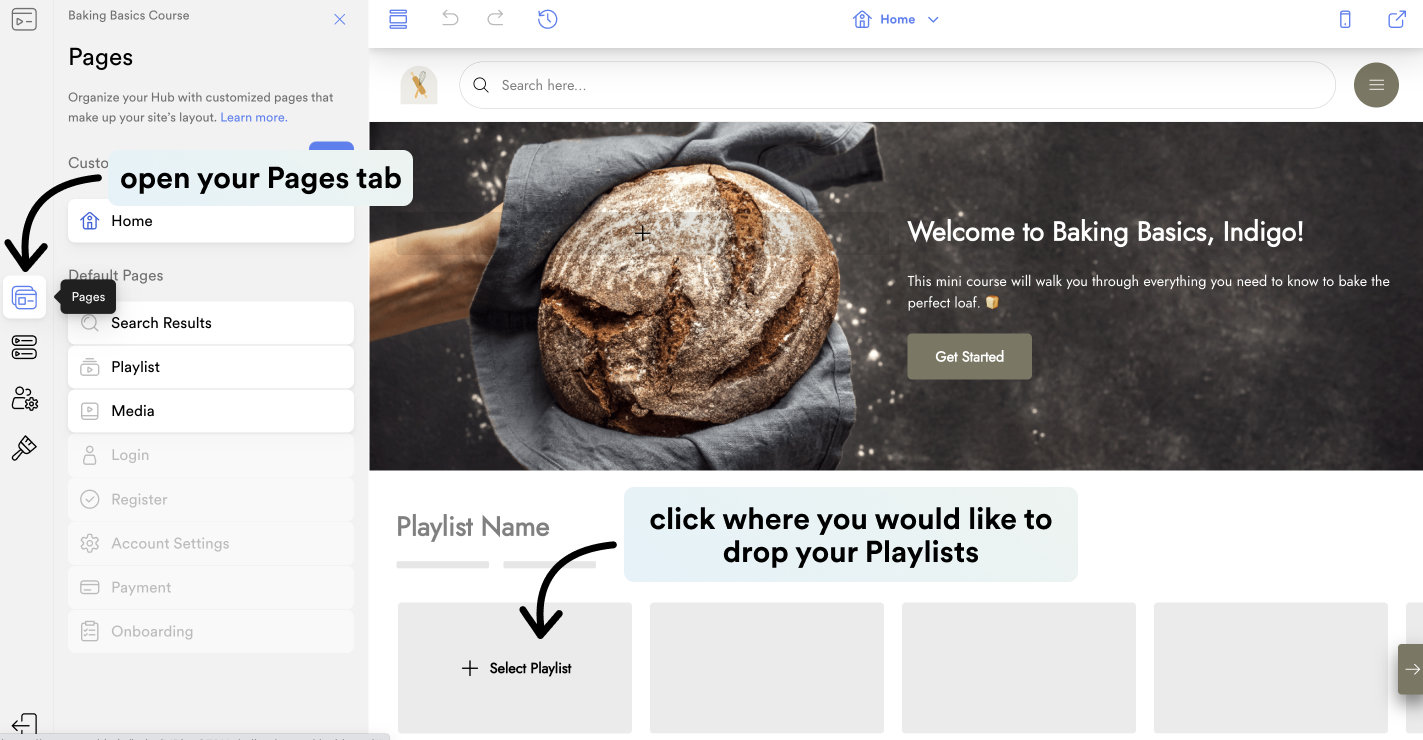
Lesson 7 - Link to your Playlist in your digital course
Once you’re happy with your Playlist, you’ll need to place it in your digital course.
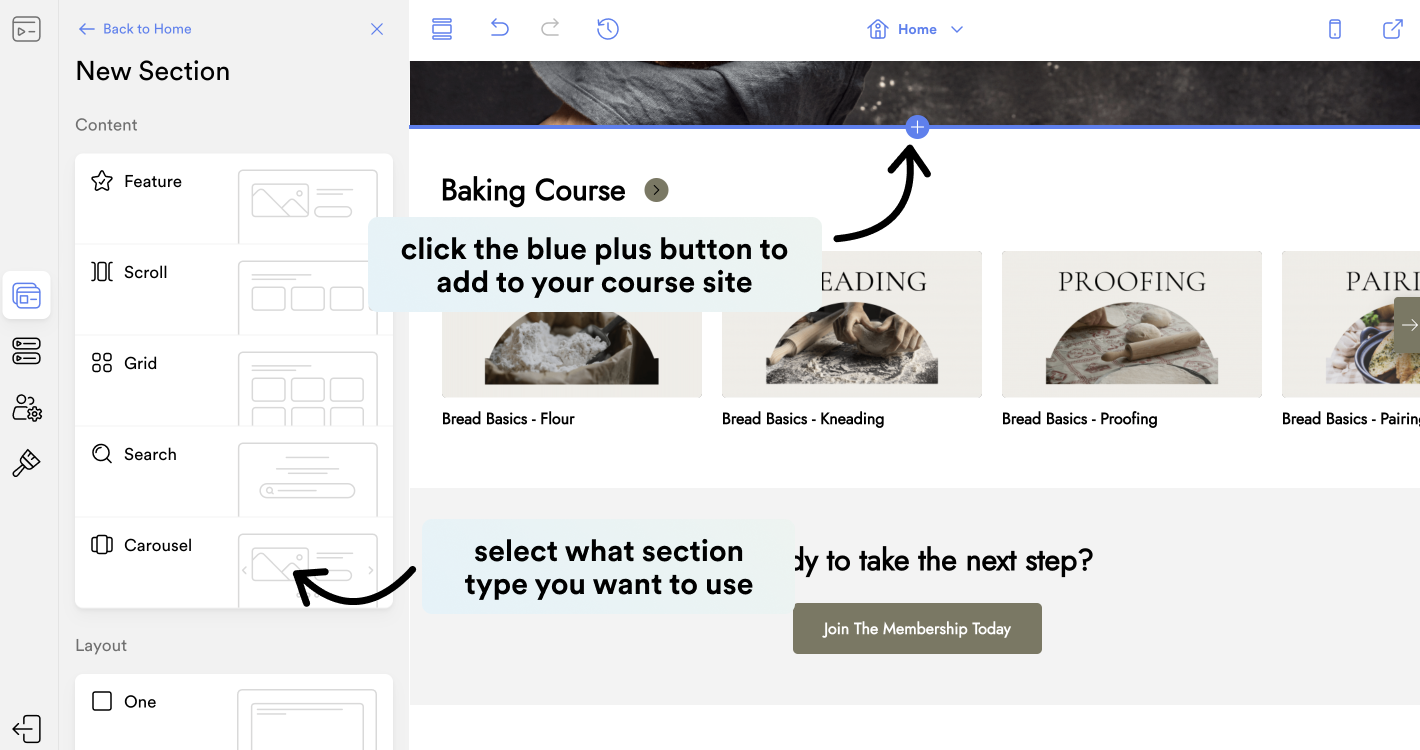
In your Hub Editor, open the Pages tab and click on the Section where you want to add your Playlist into.
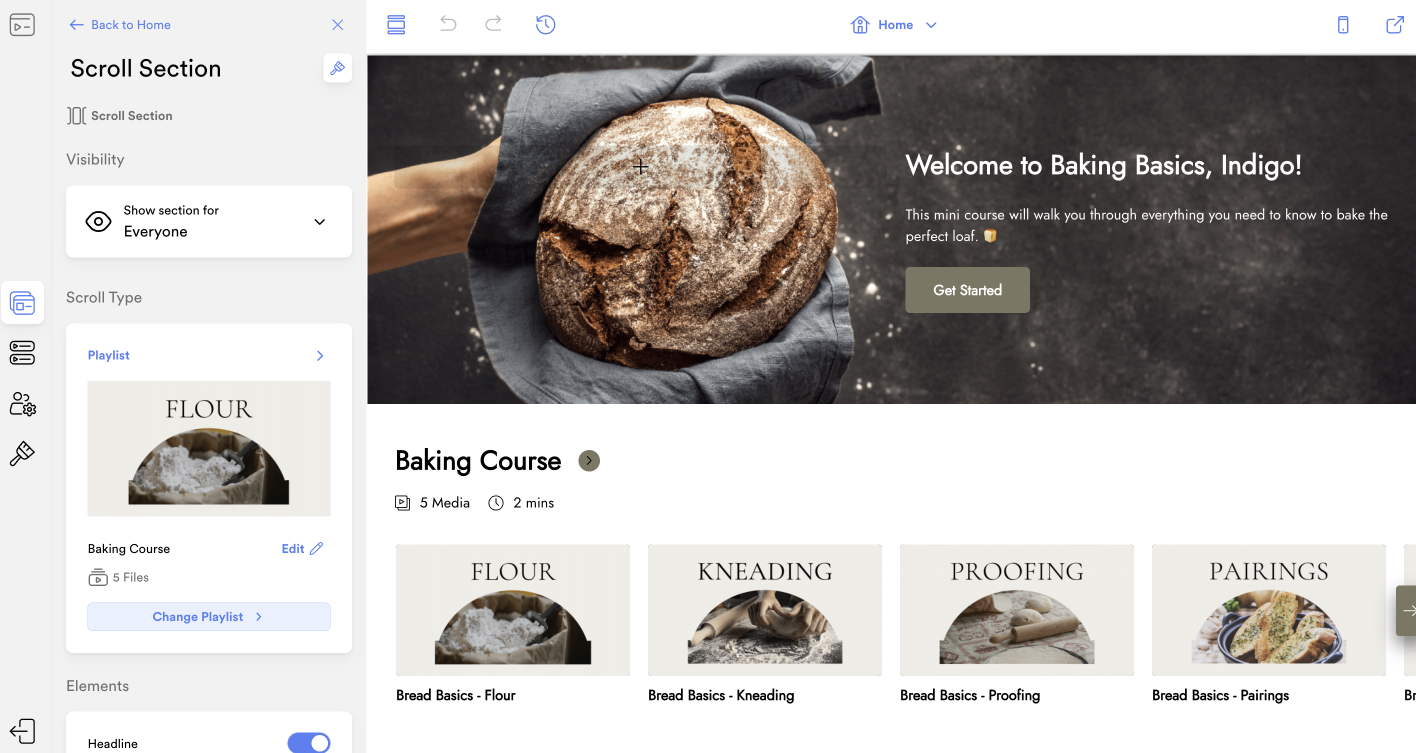
Click Select Playlist to add your selected Playlist (that you created in Lesson 5). This will add your Playlist to this location in your digital course. 🎥
Your Playlist will now appear in your Hub. ✨
Have more content?
Create more Playlists in your Content tab. You can also create more Hub Sections to fit in any other course resources you want to deliver.
Lesson 8 - Invite Your Audience
With your digital course now built (woo-hoo🥳), it’s time to decide how your members will get access to your private digital course.
Here are our top three recommendations for how to invite your audience to your Hub.
Option 1 - Collect payments with Searchie Payments (and Stripe)
This option is great if you want your members to pay to get access to your digital course.
You’ll need a Searchie Hub to sell (done ✅) and an activated Stripe account. This article will walk you through this process.
Option 2 - Use a CSV file to import your Audience
This option is a good way to bring in your members quickly. It’s a great option if you’re handling payments yourself or outside of Searchie. All you need is a CSV file with your members’ emails.
Option 3 - Add your members in manually
Sometimes it’s best to keep things simple. You can simply add your member’s name and email in to the Audiences tab of your Searchie account. More details here. This option just sings of simplicity. 🎺
Lesson 9 - Celebrate!
Congratulations!
Give yourself a round of applause.👏 You've created your very own digital course! It's time to celebrate your launch and all of your hard work!! 💃✨
Lesson 10 - Keep building with Searchie
Check out our other Searchie resources to keep exploring what you can build with Searchie. 🚀
- How to add additional pages and sections to your course
- Create a personalized course experience by segmenting your customers
- Customize your Hub’s onboarding experience
- Check out over 40+ articles on Hubs